Vagrant
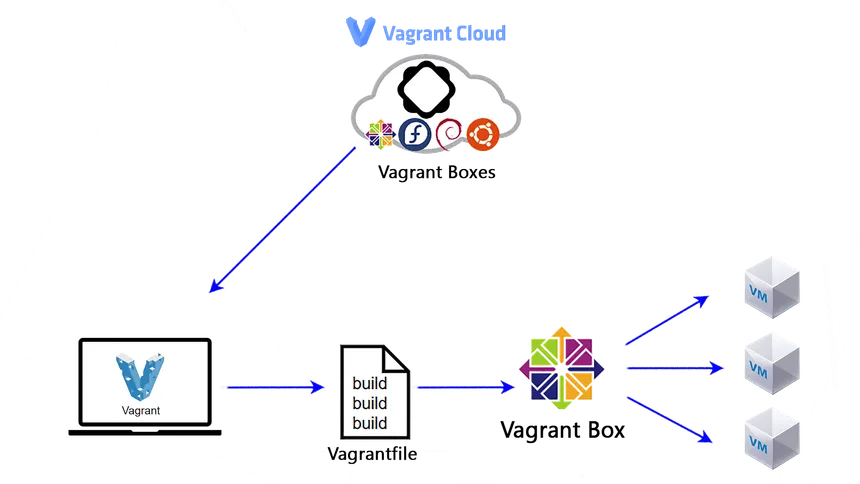
Vagrant est un outil open-source conçu pour simplifier la gestion des environnements de développement. Il permet aux développeurs de créer, configurer et gérer facilement des environnements virtuels reproductibles, isolés et configurables pour leurs projets.
Installation
Dans cet exemple on exécutera vagrant sur windows pour piloter vmware, voici les prérequis :
installer vagrant
installer vmware
installer plugin vagrant pour vmware
Initialisation
Pour initialiser vagrant se rendre dans un dossier et ouvrir un powershell ou invite de commande via clic droit.
Création du fichier vagrantfile :
vagrant init
Se rendre dans le fichier nouvellement créé, c'est ici que nous allons configurer nos VM.
Dans cet exemple on créer 3 VM avec debian approvisionnées en shell :
Vagrant.configure("2") do |config|
config.vm.define "SRV" do |config1|
config1.vm.box = "bento/debian-11.6"
config1.vm.box_version = "202303.13.0"
config1.vm.network "private_network", ip: "192.168.100.82", :hostonly => "vmnet8"
config1.vm.hostname = "SRV1"
config1.vm.provider "vmware_workstation" do |v|
v.vmx["displayName"] = "SRV1"
v.vmx["memsize"] = "4096"
v.vmx["numvcpus"] = "4"
end
config1.vm.provision "shell", path: "install_SRV.sh"
end
config.vm.define "WEB" do |config2|
config2.vm.box = "bento/debian-11.6"
config2.vm.box_version = "202303.13.0"
config2.vm.network "private_network", ip: "192.168.100.83", :hostonly => "vmnet8"
config2.vm.hostname = "WEB"
config2.vm.provider "vmware_workstation" do |v|
v.vmx["displayName"] = "WEB"
v.vmx["memsize"] = "2048"
v.vmx["numvcpus"] = "2"
end
config2.vm.provision "shell", path: "install_WEB.sh"
end
config.vm.define "BDD" do |config3|
config3.vm.box = "bento/debian-11.6"
config3.vm.box_version = "202303.13.0"
config3.vm.network "private_network", ip: "192.168.100.84", :hostonly => "vmnet8"
config3.vm.hostname = "BDD"
config3.vm.provider "vmware_workstation" do |v|
v.vmx["displayName"] = "BDD"
v.vmx["memsize"] = "1024"
v.vmx["numvcpus"] = "1"
end
config3.vm.provision "shell", path: "install_BDD.sh"
end
end
Voici les scripts à créer :
install_SRV.sh
#!/bin/bash
sudo sed -i 's/^PasswordAuthentication no/PasswordAuthentication yes/' /etc/ssh/sshd_config
sudo service ssh restart
sudo apt-get update -y
sudo apt-get install docker.io -y
sudo apt-get install docker-compose -y
sudo docker run --restart always -d -p 9000:9000 -v /var/run/docker.sock:/var/run/docker.sock -v portainer_data:/data portainer/portainer
sudo apt-add-repository ppa:ansible/ansible
sudo apt-get update -y
sudo apt-get install ansible -y
install_WEB.sh
#!/bin/bash
sudo sed -i 's/^PasswordAuthentication no/PasswordAuthentication yes/' /etc/ssh/sshd_config
sudo service ssh restart
sudo apt-get update -y
sudo apt-get install apache2 -y
install_BDD.sh
#!/bin/bash
sudo sed -i 's/^PasswordAuthentication no/PasswordAuthentication yes/' /etc/ssh/sshd_config
sudo service ssh restart
sudo apt-get update -y
apt install mariadb -y
Interactions
Valider le vagrantfile :
vagrant validate
Lancer vagrantfile :
vagrant up
On peut choisir d'installer uniquement une VM :
vagrant up SRV
Détruire les VM du vagrantfile :
vagrant destroy